

Dual Battery Systems & Alternator charging
| **These are clickable page links** | ||
| HOME | TECH INFO | SPECIALS |
| FRIDGES | SOLAR | INVERTERS |
| CHARGERS | BATTERIES | OTHER |
| CONTACT | FIND US | LINKS |
Article by Val Rigoli ©, free advice freely given, my personal thoughts and advice gathered from in-excess of 45 years of practical hands-on experience, learned skills, and industry knowledge.

you have a vehicle fitted with a smart alternator, the risk is that your auxiliary battery may not be charged correctly, or efficiently!
Also when charging lithium LifePo4 batteries a VSR should not be used, the risk is grossly over or under charging.
In both cases it is best to use a modern DC- to - DC battery charger, with a charging profile suitable for your battery type!
Auxiliary Batteries are used to operate appliances while you are away from mains 240v power,
and also so you don’t run the risk of compromising you vehicles main starting battery
(I'm sure that you agree that jump or push starting your vehicle is not much fun and best avoided.)
People
have been using and charging auxiliary batteries in their cars and
caravans with varying degrees of success for over a century.
For most
of us the days are long gone when all we needed from our auxiliary
battery was a small amount of power for a bit of lighting and maybe a
radio.
These days we expect much more, we like to run lights, TV’s, Laptops, DVD’s, pumps, fridges, winches, and charge camera batteries and mobile phones etc, some even run microwaves, it is true that some of us like all the luxuries of home when we go ‘camping’.
So over the years our demands on the humble auxiliary battery have increased to the point that we need much more usable energy, and over a longer period of time, and we need fast and safe ways to recharge our batteries.
Many of the old ways used to charge these batteries are now antiquated, and they mostly never did the job very well anyway, neither were they conducive to long battery life.
So
lets look at what we need to build a system that will deliver the best
performance for our hard earned dollars.
Warning, if you are
using lithium auxiliary batteries, then most often a VSR charging
system should NOT be used, in this case it is almost always better to
use a DC to DC charger.
Please
note,
While this is not a comprehensive step by
step guide to installing a dual
battery system, it should however give you a very good insight as to
what
is really needed, and why, and how to go about sizing and fitting it
all up.
What’s needed.
Well
I guess a good place to start would be an auxiliary battery, then we
need an efficient way of charging this battery using the cars
alternator, and most importantly, a way of isolating the auxiliary
battery
from your
starting battery, so that your starting battery is not compromised, and
so you will always be
able to start you vehicle and not be left stranded.
To do this we use what is called a
battery isolator, and then we need some cable to
connect it all up, simple eh, well it is simple as long as you use the
right bits, and put it together the right way……
Auxiliary Batteries.
Basically
you should be thinking about how big a battery can you fit, and less
about how small and cheap a battery you can get away with, now I know
money does not grow on trees, however the larger
the battery the less percentage wise you will be draining it each day,
and the
longer it will last for you, both in power usage (battery capacity),
and in battery life
(longevity), with the
extra advantage of some extra capacity available to you if needed.
Hot
Tip …Batteries be they lead acid batteries wet cell, and sealed batteries, either AGM or GEL, they just LOVE
being fully charged,
they do
NOT (never)
much like being discharged at
all, they do LIKE it when you only take
them down to about 50% of their capacity, and then top them back up
soon as you can (within a day or so).
Batteries will lose capacity if left discharged, and they will die quickly if left discharged for
long lengths of time.
Deciding on what size and type of Auxiliary Batteries to use is really a whole other story, please read my article on AGM (Absorbed Glass Matt) batteries >>Please click here for my article on AGM batteries<<
The Battery Isolator.
The battery isolator is a device that allows the cars alternator to recharge the auxiliary battery while protecting the cars starting battery from discharging, if these batteries are simply linked together you run the very real risk of draining them both to a level that you can not start the engine, and there are many other reasons why you should not do it this way.
So hence we have the battery isolator, there are many different methods used to isolate the batteries, most use some form of solenoid, this is an electronic switch that can handle large (charging) currents, much more than standard switches can, and they are operated by applying a small amount of power to them, this is turn actuates a solenoid that links the batteries together so that large currents and be passed between the batteries.
There are many ways to operate these battery isolators, some much better that others.
The cheapest way is that you manually turn them on and off, I call these idiot switches, because sooner or later some idiot (and I've been there) will forget to turn the switch on (no charge goes into the auxiliary battery) or off at the right time (and then the starting battery gets drained as well).
Another way of doing it is to have the solenoid turn on as soon as you start the engine up, and turn off when you shut down the engine, this has been the cheap way of doing it for many years, but it’s far from ideal and does have a few pitfalls.
I believe the best way for most situations is to use a VSR (Voltage Sensitive Relay) activated solenoid, and I explain a little further on how they work and why I think they are so good.
Now
for
years I had used the Redarc Smart Start VSR with great success,
and I've sold hundreds of them,
they really are a good unit.
However a while ago after doing more research and testing I came across another VSR that I found I liked even better, with many great features, and I've listed some of them below in my explanation of how it works.
This
one I like the best and now use is also one of the
least expensive ones, and it does the
job
very well, truly
ultra reliable (has been used in the boating/marine industry for many
years), and
I believe these are as good as, and often better than many of the much
more expensive VSR's.
PS,
I sold
over
1,900 of these Enerdrive ones, and my customers loved them :-)
My choice now is the Enerdrive VSR battery isolator, and I explain below how it works.

These Enerdrive VSR's are priced at around $79.95
Please note, if you have already bought, or prefer to use the Redarc Smart Start VSR, I have an information page on how they work and how to install them >>please click here for the Redarc Smart Start VSR details<< otherwise please read on below.When you start your engine the Enerdrive VSR works by first letting your starter battery recover it’s charge from the alternator, it lets the cranking battery achieve 13.3 volts, at this point that battery now has about as much charge in it as it's going to get, now once the Enerdrive VSR sees this 13.3 volts it closes the contacts on the solenoid, this links both batteries together for charging purposes.
The next thing the Enerdrive VSR is looking for is 12.8 volts, in other words it's likely that you have now shut down your engine and started to draw power from the batteries, so after a short while the voltage across both batteries will slowly fall, and when they get down to 12.8 volts, the Enerdrive VSR will see this voltage it will open up the solenoid contacts and isolate the batteries, leaving your starting battery for starting, and your auxiliary battery for auxiliarying ;-)
I love how compact it is, with no ugly exposed cable posts sticking out.
The unit is waterproof, so a bit or even a lot of water is not going to stop the Enerdrive VSR from working.
The Enerdrive VSR battery isolator is rated at 140Amps constant duty.
It also has Surge Protection so it won’t upset the delicate electronics on newer vehicles.
When the VSR is engaged (closed, linking the batteries together) a red LED comes on the top of the Enerdrive VSR .
This VSR consumes no power at all while it is not engaged, i.e. the voltage of both batteries has dropped below 12.8V, and then it consumes only 0.34A when it is engaged.
 The Enerdrive VSR
has one more huge
advantage in that it is Dual
Sensing (bi directional),
what this means
is that if you have a battery charger, or solar power connected to
your auxiliary
battery, and that battery gets charged enough to hit the Enerdrive
VSR's
set points, then it will allow your charging source to back
charge the cranking battery as well,
making sure that it's kept fully charged too, but again, if the voltage
drops below 12.8 volts, the Enerdrive
VSR will again disconnect
(isolate) the
batteries, so how cool is that!
The Enerdrive VSR
has one more huge
advantage in that it is Dual
Sensing (bi directional),
what this means
is that if you have a battery charger, or solar power connected to
your auxiliary
battery, and that battery gets charged enough to hit the Enerdrive
VSR's
set points, then it will allow your charging source to back
charge the cranking battery as well,
making sure that it's kept fully charged too, but again, if the voltage
drops below 12.8 volts, the Enerdrive
VSR will again disconnect
(isolate) the
batteries, so how cool is that!
The Wiring & Cabling.
Wiring…this is without doubt where many people get it wrong and end up with a system that may work, BUT barely, and nowhere near as well as it could and should, doing it right can double the usable capacity of your auxiliary batteries over and above what many people normally have, and it will also help them charge much faster, and in turn they will last longer too.
Please understand that when charging from a vehicle alternator one of your biggest enemies is voltage drop, you need to have the highest possible voltage at the auxiliary battery, this will allow it to charge as quickly as possible, and as fully as possible.
Some standard set-ups I see regularly that have been fitted by the so called professionals is where they use twin 6mm auto cable (really 4.59mm²), this is next to useless for fast, deep charging.
A very basic explanation would be, that the larger the current draw, the larger the wire (cable) needs to be, and the further the distance the wire/cable needs to run, the increasingly larger again the wire/cable needs to be, resistance over distance is the problem.
Water
and power analogies work well here, so think about it, if you want to
fill a bucket full of water fast, would you use a hose the size of a
straw, or a ½ inch garden hose, or bigger (bigger is always
best!), what one do you think will
fill the bucket quicker?
I always suggest a minimum,
yes I did say
a minimum of
6 B&S
(13.5mm²) cable for linking batteries, larger is even
better, any further improvements to the charging time, and system as a
whole, will be gained by increasing the size of this cable, I know that
the larger
cable
is not cheap, but
bigger is always best in the long run. Check out the photo near the
bottom of this article showing the difference between 6mm auto
cable I
mentioned before and the 6
B&S cable that I recommend as a minimum!


Putting
fuses in is necessary because of the potential of a short circuit, now
seeing as we are installing good heavy cable so that we can transfer
large amounts of current quickly, there is a possible downside
......................
Now these good sized cables when short circuited to say the
vehicle
body, or between them selves either by chafing through, getting hooked
by a stick, or heaven forbid, an accident, are capable of producing huge
amounts of flame and
spark (and I mean huge), and this is why we really must
install fuses to
protect the cabling, the vehicle, and us!
Here we use 100A fuses, these are purely to protect the
cable, or
more correctly, as I have just said, to protect you and your vehicle, from the cable,
and we need
two (or more) of them, one at each battery or battery set, because each battery
will be
connected to the same cable, even some auto sparkies can't get their
heads
around this, as they are so used to having only one supply source for
the power, not two or more!
After
having a few
failures sometime back using 100A Maxi fuses (they were melting, not
blowing, melting because of high
resistance, this
created heat with the high currents),
so after doing a lot of
testing I found that the MEGA fuse performed best in this situation,
the MEGA fuse has been used for many years when connecting Inverters
and other very heavy draw appliances to
batteries.
Have a look at the photo of a MEGA fuse in it's holder near
the bottom
of this article, another good thing about this fuse and it's holder is
you can use it as a power stud, and have all of your positive cable
connections coming off one side of the fuse, with just a single link
between the fuse and the battery, it helps make for a much easer,
simpler, and neater job. Tip,
often I mount these fuses right on top of the battery using a piece of
aluminum flat bar with the holes drilled in it, really neat,
and a photo down there of this also, I call these battery links, and
yes I used sell them on eBay too
The MEGA fuse was
considered expensive, however I imported
these in bulk from the UK, and I used to pass on the savings to my
customers so
that they could take advantage of these very good quality fuses, at a
very good price.
I have now semi-retired and no longer sell these fuses, or the VSR's,
or anything really, but because of the good pricing that I introduced
all those years ago, now many others on eBay also sell them at good
prices.
Battery placement.
A very important thing to consider is where you are going to place your batteries, standard open wet cell batteries give off hydrogen gas when they are charging and discharging, this is a very explosive gas, remember the Hindenburg, there is no problem if you are putting the auxiliary battery under the bonnet of your vehicle, or mounting it somewhere on the chassis with good ventilation to the open air.
Just throwing them under a seat or in a cupboard is far from ideal and just down right dangerous, even worse some people place battery chargers and even inverters next to these batteries, just think about that for a moment, a hydrogen producing device next to a possible spark producing device, I guess some people just don't know or don’t think!
Wet cell batteries must be housed in a properly vented area, and must be well vented externally away from any ignition source and from human habitat areas, hydrogen gas rises so sealed battery enclosures should be vented externally top and bottom.
If you need to place batteries inside vehicles, then AGM batteries should be seriously considered here as they are totally sealed, AGM batteries if placed in an enclosure only need to be vented to atmosphere not necessarily vented externally.
Putting AGM batteries under the car bonnet is fine as far as safety goes, the only consideration here is that AGM’s and any fully sealed batteries should be kept away from the extreme temperatures of turbochargers, and if they must be placed close to the turbocharger, then heat shields should be used.
How
to wire it all up.
Now
this is much simpler than most people think, it is not complex, and as
long as you take care almost anyone can do it.
Safety Tip * Do not install the Mega fuses until the last thing, when you have completely finished all the cable runs and tightened up all other connections first.
Note: * Some people can use the chassis for earth return, but my advice is don't, and to always (and it really is best) run the earth/negative cable all the way between the start and auxiliary batteries, for the extra few dollars in cable it really is worth it, and you only have to do it once, so do it right the first time please.
When running
the cables
between the batteries you should take great care with where you place
the cable, making sure that it won’t rub or be cut through,
also be careful to keep it clear of sharp corners etc, and if the
auxiliary battery is going to be placed anywhere other than under the
bonnet, you should seriously consider using a protective covering like
split convoluted tubing and secure it well with clips or
cable
ties at
well spaced intervals.
If your auxiliary battery is in a caravan or trailer then the standard trailer lights connectors are way too small for the 6 B&S cable, and can’t even come close to handling the high currents for effective battery charging, so here we use 50A Anderson plugs (Pictured below).
All cable lugs used with the 6 B&S cable are far too big to be crimped with standard crimping tools, so they should be crimped by an auto electrician, or if you do have one of the special correct large crimping tools, or can borrow one, as it is essential that you have a very sound crimp joint, or you could have major catastrophic problems.
The Enerdrive VSR
battery
isolator has two main cable posts underneath it, these are for
connecting the main positive
battery link cables to, so here the one with the red dot on the stud,
this is where you connect the cable coming from the MEGA fuse
on the starting/cranking battery, and the other post is for
the
link cable that
is running to the auxiliary
battery positive
MEGA fuse.
The Enerdrive VSR
has
one small black wire coming from it, and is
simply an earth that should be secured under one of the screws that you
mount the VSR to the vehicle with, if that is metal that is grounded
to the chassis, otherwise you will have to go
to another nearby good
earth point (bolt/nut or screw) with proper grounding.
Strong Tip,
for the very best VSR operation, the VSR needs to be mounted as close
to the cranking battery as possible, and the cable size between both
batteries also plays a huge part in optimal VSR operation, also battery
charging speed and efficiency.
It
really is simple, next
the earth/negative
cable simply gets connected
to the negative terminal of both batteries, but again using the good
sized 6 B&S cable..............
Now see how easy that was.............yes I
know there is some monkey work laying in the cable, sometimes crawling
under the car to secure wires etc if you can't run them inside the car,
but still simple :-)
Below are some examples of how an auxiliary battery set-up may be done, but there are many many other combinations that can be done to suit almost all needs.

This
is a basic layout for those
that might install an auxiliary battery in the back of their vehicle.

This
is for those that might install an auxiliary battery under the
bonnet
of their car.

This
is
for those that might install an auxiliary battery in their Caravan or
camping trailer.
A
bit about Anderson
Plugs
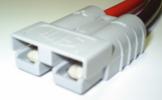

Above
is a couple of
photos
of the very practical Anderson Plug, a well designed plug,
and
the very best way
to safely
connect heavy cables together, they have a 50A
continuous rating.
Their unique design incorporates no gender, both connecting plugs are
identical,
so they can not possibly be hooked up wrongly, and there is no risk of
shorting out the batteries in the dark,
they are also self cleaning, so a bit of mud won't worry them, you need
two to make a connection.
Val's note!!
If I don't see a set of these Anderson Plugs at the back of your car,
I know that your gas fridge just
can't be getting the right amount of power that it requires,
and as for efficient battery
charging without these Anderson Plugs , almost
imposable!
These
Anderson plugs can be bought cheaply from eBay, or from any
good auto electrical supplier.


These
above
are Mega fuse holders and a
100A Mega fuse, you will need one of these at each battery bank,
A MEGA FUSE KIT, this comprises of 2 x MEGA FUSE HOLDERS
(mounting blocks),
plus 3 x100A MEGA FUSES (that's one fuse for each mounting
block, plus one as a spare).
I
have now retired and no longer sell these fuses, however because
of the good pricing that I introduced all
those years ago,
now many others on eBay also sell them at good prices.
These MEGA fuse
kits, are ideal for dual battery systems, and
for only around $69.95
on eBay
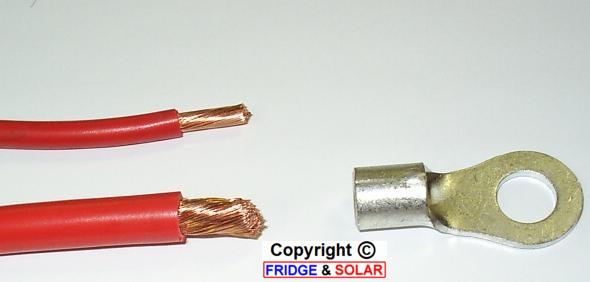
The
larger cable above is the minimum size required
6
B&S (13.5mm²) and matching lug, note the wire above it,
that's the 6mm (4.59mm²) Auto cable used by many to do the
job, it's just not up to the task it at
all.
The 6 B&S cable is about $5.50 per Mtr, and you need enough red
and
black to run between
both batteries
This cable can be
bought from many
suppliers on eBay, or from any
good auto electrical supplier,
it is also available in twin (Red & Black) sheathed.
Note, I
have now retired.
I am concentrating more on updating and writing more of my-
'Technical and not so technical information' articles,
these have become very popular!
(I'm
real chuffed, thank you for all your kind words and encouragement folks).
Copyright
© Val Rigoli
![]()
Copyright © FRIDGE & SOLAR since 2002